Let's say you have your LDAP directory connected to your VMware Identity Manager (vIDM) environment. This will provide access to your resources for your employees. After a user logs in to the Workspace ONE console with their AD credentials, it will show the resources they are assigned to:

But what if your company collaborate with other companies that want to access that same resources. You obviously don't want to connect all those LDAP directories and sync the users and groups to your vIDM environment. For this we can use something that's called a Third Party Identity Provider or 3rd party IDP. vIDM supports all sorts of IDP's, like for example ADFS, Okta or Ping identity.
In this blog i will take you through the steps to setup and configure your vIDM to connect to an external ADFS environment:
ADFS Configuration
First ADFS need to be configured properly, to set this up the following requirements are needed:
- Signed SSL Certificate
- Windows Server
- Active Directory Domain
On your Windows Server first add Federation Services as a role in Server manager on your server and make sure you follow the on-screen instructions to install it properly:
Installation

Configuration
After installation you will be able to configure the Federation Services. Make sure you have an SSL certificate ready for the domain you would like to connect to and use a Service Account that has access to the Active Directory domain.
Follow the installation steps on the screen and click configure after you confirmed the prerequisites.

AD FS Management
After you have configured ADFS you can AD FS Management:

In AD FS Management go to AD FS > Service > Endpoints.
Look for Federation Metadata in the section Metadata, it should look something like this:
FederationMetadata/2007-06/FederationMetadata.xml
Copy/type this in your browser and put your ADFS URL before it to download the XML file. This will be used in the configure the VMware Identity Manager:
https://adfs.example.nl/FederationMetadata/2007-06/FederationMetadata.xml
vIDM Configuration
Login to your Identity Manager portal as an administrator:
After login go to the ‘Identity & Access Management’ tab and make sure that on the left you are in the ‘Manage’ section. In here you can open ‘Identity Providers’ to configure your ADFS IDP.
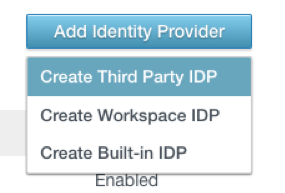
In Identity Providers, click on ‘Add Identity Provider’ and choose ‘Third Party IDP’
Create and name for the IDP, for example; ‘ADFS IDP’
In the SAML metadata either copy the contents of the xml file you downloaded from the ADFS server or copy and paste the link. Then click on ‘Process IDP Metadata’
This will populate al the Name ID formats for the SAML response, leave everything default.
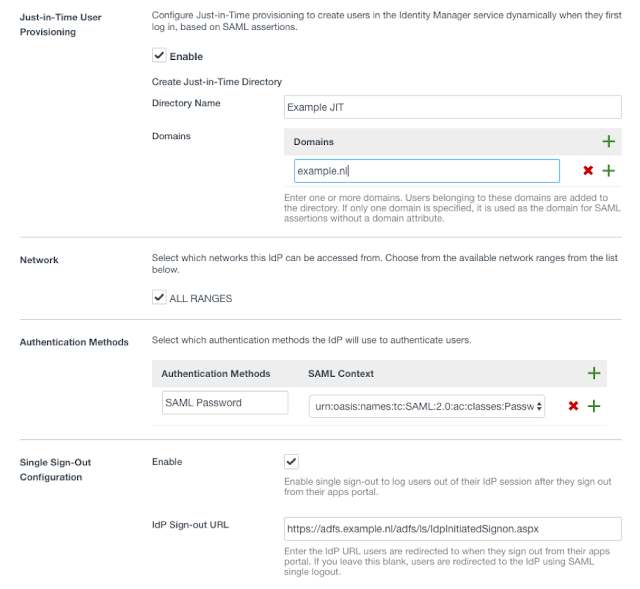
In this case we want to use Just-in-Time User Provisioning, so enable this.
After you checked the JIT box, enter a name for the domain from your ADFS server and enter your domain you want to use for JIT creation.
For Network use the default ‘All Ranges’
Create a new SAML authentication method as shown below.
Optionally you can configure a sign out page for the users gets redirected to after they logout of their session. For example I use the ADFS login page:
Before adding the IDP, make sure you download or save the URL of the SAML metadata of de Service Provider.
Click Add.
Relying Party Trust in ADFS Configuration
On the ADFS server open ADFS management, go to Relying Party Trust and create a Claims Aware Relying Party Trust:
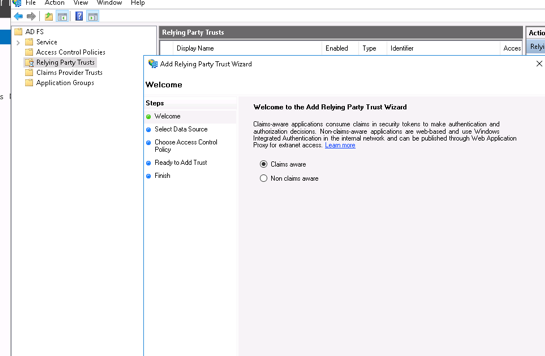
Click start
Enter the Metadata url from from the Identity Manger:
https://youridentitymanager.vmwareidentity.eu/SAAS/API/1.0/GET/metadata/sp.xml
If the URL of the vIDM is not reachable from your ADFS server you can download the sp.xml in a text file and upload it manually.
Leave all the settings default and finish the configuration.
Claim Rules
After the Relying Party Trust is configured you need to configure some claim rules for the Username, Email, Firstname and Lastname.
Right click your Relying Party Trust and click Edit Claim Issuance Policy.
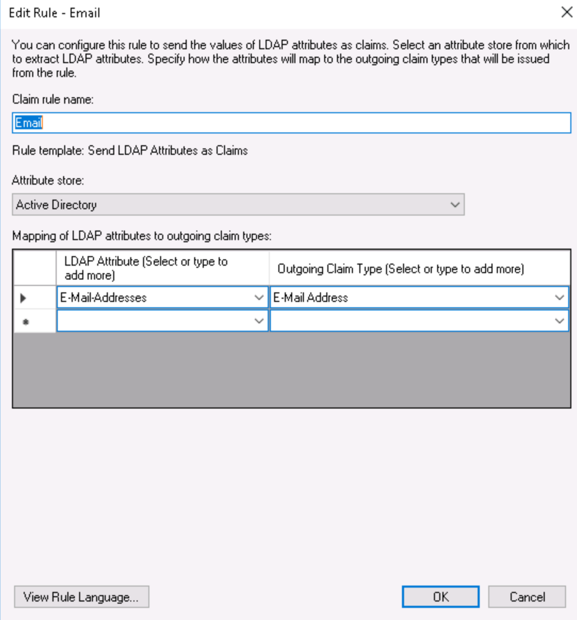
Email
Add Rule and Choose the template: Send LDAP Attributes as Claims. Hit next and fill in the data as shown below and click OK.
Create another rule and now choose for ‘Send Claims Using a Custom Rule’
Fill in a name and past in the the following data and make sure you change the Identity Manager URL to your tenant:
c:[Type == "http://schemas.xmlsoap.org/ws/2005/05/identity/claims/emailaddress"]
=> issue(Type = "http://schemas.xmlsoap.org/ws/2005/05/identity/claims/nameidentifier", Issuer = c.Issuer, OriginalIssuer = c.OriginalIssuer, Value = c.Value, ValueType = c.ValueType, Properties["http://schemas.xmlsoap.org/ws/2005/05/identity/claimproperties/format"] = "urn:oasis:names:tc:SAML:1.1:nameid-format:emailAddress", Properties["http://schemas.xmlsoap.org/ws/2005/05/identity/claimproperties/spnamequalifier"] = "youridentitymanager.vmwareidentity.eu");
Click OK.
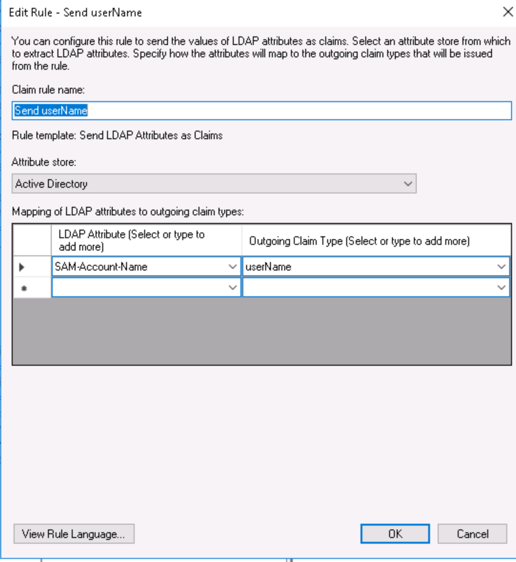
Username
Create a new LDAP Attributes rule for username and fill in as follows:
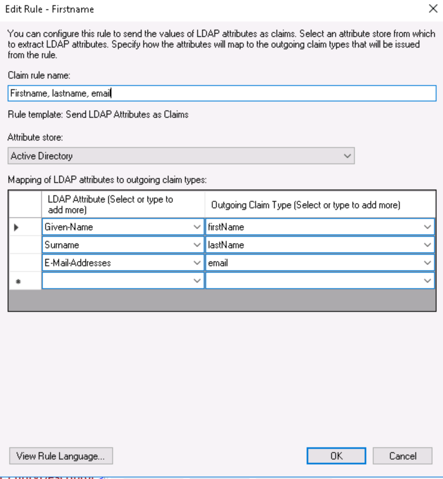
Firstname, lastname and email
For the user get properly created during the JIT process in Identity Manager you need to assign the LDAP attributes of Firstname, lastname and email to the attributes used in vIDM.
Create again a new LDAP attributes rule like this:
Hit OK and now the ADFS configuration is finished.
After you have configured ADFS you can AD FS Management:

In AD FS Management go to AD FS > Service > Endpoints.
Look for Federation Metadata in the section Metadata, it should look something like this:
FederationMetadata/2007-06/FederationMetadata.xml
Copy/type this in your browser and put your ADFS URL before it to download the XML file. This will be used in the configure the VMware Identity Manager:
https://adfs.example.nl/FederationMetadata/2007-06/FederationMetadata.xml
vIDM Configuration
Login to your Identity Manager portal as an administrator:

After login go to the ‘Identity & Access Management’ tab and make sure that on the left you are in the ‘Manage’ section. In here you can open ‘Identity Providers’ to configure your ADFS IDP.
In Identity Providers, click on ‘Add Identity Provider’ and choose ‘Third Party IDP’
Create and name for the IDP, for example; ‘ADFS IDP’
In the SAML metadata either copy the contents of the xml file you downloaded from the ADFS server or copy and paste the link. Then click on ‘Process IDP Metadata’
This will populate al the Name ID formats for the SAML response, leave everything default.
In this case we want to use Just-in-Time User Provisioning, so enable this.
After you checked the JIT box, enter a name for the domain from your ADFS server and enter your domain you want to use for JIT creation.
For Network use the default ‘All Ranges’
Create a new SAML authentication method as shown below.
Optionally you can configure a sign out page for the users gets redirected to after they logout of their session. For example I use the ADFS login page:

Before adding the IDP, make sure you download or save the URL of the SAML metadata of de Service Provider.
Click Add.
Relying Party Trust in ADFS Configuration
On the ADFS server open ADFS management, go to Relying Party Trust and create a Claims Aware Relying Party Trust:

Click start
Enter the Metadata url from from the Identity Manger:
https://youridentitymanager.vmwareidentity.eu/SAAS/API/1.0/GET/metadata/sp.xml
If the URL of the vIDM is not reachable from your ADFS server you can download the sp.xml in a text file and upload it manually.
Leave all the settings default and finish the configuration.
Claim Rules
After the Relying Party Trust is configured you need to configure some claim rules for the Username, Email, Firstname and Lastname.
Right click your Relying Party Trust and click Edit Claim Issuance Policy.
Add Rule and Choose the template: Send LDAP Attributes as Claims. Hit next and fill in the data as shown below and click OK.

Create another rule and now choose for ‘Send Claims Using a Custom Rule’
Fill in a name and past in the the following data and make sure you change the Identity Manager URL to your tenant:
c:[Type == "http://schemas.xmlsoap.org/ws/2005/05/identity/claims/emailaddress"]
=> issue(Type = "http://schemas.xmlsoap.org/ws/2005/05/identity/claims/nameidentifier", Issuer = c.Issuer, OriginalIssuer = c.OriginalIssuer, Value = c.Value, ValueType = c.ValueType, Properties["http://schemas.xmlsoap.org/ws/2005/05/identity/claimproperties/format"] = "urn:oasis:names:tc:SAML:1.1:nameid-format:emailAddress", Properties["http://schemas.xmlsoap.org/ws/2005/05/identity/claimproperties/spnamequalifier"] = "youridentitymanager.vmwareidentity.eu");
Click OK.
Username
Create a new LDAP Attributes rule for username and fill in as follows:

Firstname, lastname and email
For the user get properly created during the JIT process in Identity Manager you need to assign the LDAP attributes of Firstname, lastname and email to the attributes used in vIDM.
Create again a new LDAP attributes rule like this:

Hit OK and now the ADFS configuration is finished.
Identity Manager Policies configuration
To make sure the new Identity Provider is used when a user logs in, you need edit the default policy configuration.
In vIDM go to Identity Access Management, in Manage go to Policies.
In the policies, edit the Default Policy:

In the Policy you can specify what devices, networks or groups can authenticate through the ADFS IDP. In this example I use All Devices and All Ranges.
In the authentication section make sure you pick in ‘then the user may authenticate’ the created SAML Password authentication method.
You can specify a fallback method for the users whenever the ADFS IDP fails to authenticate, for example Password(Cloud Deployment)
Hit Save after you are done.
Now when you open up a private window in your browser and navigate to you identity manager url, it will redirect do your ADFS login page

Depending on your Active Directory configuration you can login with your directory credentials and the user gets created in the Identity Manager.
Comments
Post a Comment